Unity Job System and Burst: A Foolproof Guide on How to Use Them Correctly?
If the sole purpose is multithreading, using Async for thread switching or System.Threading is the most convenient and clear method. Burst can also be called directly, not necessarily requiring Jobs. See the articles on Asynchronous Programming and Direct Invocation. However, if you have a large number of small computations, then you should consider the Job System.
Unity’s Job documentation is extremely incomplete. This article is a record of long-term usage experience and should be relatively comprehensive.
Purpose and Limitations of Jobs
Unlike general multithreading approaches, the Unity Job System is a system that simulates GPU-like high throughput through multithreading, meaning the overhead of task distribution is extremely low.
Jobs can only handle computations within a single frame, similar to CUDA/shader functions, they are small kernels. Heavy computations will still affect FPS because Jobs are sometimes assigned to run on the main thread. If you want to run long-duration calculations, either split them into many small Jobs, otherwise .Net threads are still the best.
So the question arises: since it’s similar to GPU, why not just use ComputeShader? Indeed, ComputeShader can do everything Jobs do, and more conveniently. Unless:
- If frequent data exchange with the CPU is needed, which GPUs are not good at, CPU-based Jobs have an advantage.
- The ECS (DOTS) system is based on Jobs, for the same reason as above.
Note: WebGL does not support Jobs, ComputeShader, or Burst acceleration. However:
- WebGL is being replaced by WebGPU, which supports ComputeShader, and newer browsers already support it (IOS 17 requires enabling in settings, 19 preview has it enabled by default).
- Enabling WebAssembly 2023 in settings can enable multithreading support for Jobs, and browser support is more comprehensive. But officially, it’s not even considered an experimental feature and should not be used. Unity 6 LTS crashes when enabled. They have been struggling with wasm multithreading for many years. Moreover, DOTS is currently receiving more attention, and with .Net 8 supporting wasm multithreading, perhaps they are waiting for Unity 7 to support .Net 8.
Performance
Providing performance metrics helps understand design intent and applicability. You can also read the article first and then come back to the performance tests.
Eight projects were tested. First, the performance of three allocators was tested:
- BenchAllocatorTemp: Executes 100,000 Allocator.Temp allocations.
- BenchAllocatorTempJob: Same as above, using Allocator.TempJob.
- BenchAllocatorPersistent: Same as above, using Allocator.Persistent.
The result was TempJob being the fastest, followed by Persistent.
Then, the performance of four Job patterns was tested:
- BenchBaseLine: Uses a For loop to execute 100,000 simple calculations as a reference baseline.
- BenchIJob: Time to schedule 100,000 Jobs.
- BenchIJobParallelFor: Time to batch schedule 100,000 Jobs in parallel mode.
- BenchIJobParallelForBurst: Same as above, but with Burst enabled.
- BenchIJobParallelForBurstLoopVectorization: Schedules 10 Jobs, each Job uses a For loop to calculate 10,000 times, with Burst vectorization enabled.
Here are the test results on my PC:

Median is the median time taken by the test project, in milliseconds.
It can be seen that Job scheduling overhead is small, designed for executing a large number of tasks. Of course, I only performed simple multiplication calculations here, so the Job improvement is limited.
Data Types
First, Burst does not support C# managed types. It can only use types with the same length as C, which can be directly memcpy’d (no serialization/marshaling required), called blittable types. These include basic types like int (char, string, and bool are sometimes managed, don’t use them), and 1-dimensional C-Style arrays of blittable types (new int[5]). Since Jobs are inevitably used with Burst, follow this restriction.
Unity has encapsulated a thread-safe type NativeArray specifically for Job use. These types can share data with the main thread without copying because only the data pointer is passed during copying; multiple copies reference the same memory region. Derivatives include NativeList, NativeQueue, NativeHashMap, NativeHashSet, NativeText, etc.
Note: You cannot use code like nativeArray[0].x = 1.0f or nativeArray[0]++; as the value won’t change because it returns a copy, not a reference.
Thread Safety
Thread safety is achieved by restricting scheduling. The same NativeArray instance can only have one Job writing to it; otherwise, an exception is thrown. If data can be parallelized by segmentation, IJobParallelFor can be used to execute on NativeArray in batches. For read-only data, you can mark member variables with, for example, [ReadOnly] public NativeArray<int> input;.
While a Job is writing, the main thread cannot read the NativeArray; it will report an error. You must wait for completion.
Memory Allocation
First, Native types need to be manually Dispose()d after use; they are not automatically destroyed. For this, Unity added memory leak tracking.
When creating Native types with new, you need to choose one of three allocators: Temp, TempJob, Persistent. Allocation speed is from fast to slow. Temp has a 1-frame lifetime, TempJob has 4 frames. What does this mean?
Tempmeans it’s for use within the current function, and you shouldDispose()it before the function ends. Therefore, if you forget to Dispose, Unity will report an error immediately during the next render. However, this allocation speed is actually quite slow.TempJobhas more lenient error conditions. It’s still intended for use within 1 frame, but you can Dispose it in the next frame.Persistentwon’t report errors; you need to be careful yourself.
The BenchAllocator project in the previous performance test tested the performance of these three. It can be seen that Allocator.Temp took 4 times longer than TempJob. The documentation says Temp is the fastest; this is either a bug or an Editor mode issue.
Executing Single-Threaded Jobs
The entire process involves writing your own IJob class, scheduling it from the main thread with Schedule, and then calling Complete to block and wait for the Job to finish.
public struct MyJob : IJob {
    public NativeArray<float> result;

    public void Execute() {
        for (int j = 0; j < result.Length; j++)
            result[j] = result[j] * result[j];
    }
}

void Update() {
    result = new NativeArray<float>(100000, Allocator.TempJob);

    MyJob jobData = new MyJob{
        result = result
    };

    handle = jobData.Schedule();
}

private void LateUpdate() {
    handle.Complete();
    result.Dispose();
}
But the problem is, we use Jobs for a large number of tasks; a single task like this isn’t very useful. The parallel pattern similar to GPU is more useful.
Parallel Pattern (Parallel Job)
Changing the above code from IJob to inheriting IJobParallelFor is the parallel pattern.
public struct MyJob : IJobParallelFor {
    public NativeArray<float> result;

    public void Execute(int i) {
        result[i] = result[i] * result[i];
    }
}

void Update() {
    result = new NativeArray<float>(100000, Allocator.TempJob);

    MyJob jobData = new MyJob{
        result = result
    };

    handle = jobData.Schedule(result.Length, result.Length / 10);
}

private void LateUpdate() {
    handle.Complete();
    result.Dispose();
}
The parallel pattern doesn’t require you to write the For loop yourself; it executes Execute once for each element, similar to Shader.
Schedule(result.Length, result.Length / 10) means executing Execute for each unit from index 0 to result.Length, distributed across 10 workers.
For performance differences between IJob and IJobParallelFor, see the previous performance test.
Parallel Restrictions
In IJobParallelFor, you can only write to element i, and it doesn’t know which member Array you want to write to, so all Arrays can only write to element i. However, you can add the [NativeDisableParallelForRestriction] attribute to the NativeArray to disable safety checks, ensuring no write conflicts yourself.
Read-only mode has no restrictions on all Native containers.
Additionally, IJobParallelFor cannot enable loop vectorization unless your calculation already uses vectorization (calling other vectorized functions); otherwise, performance is still not optimal.
Using NativeList and Other Containers in Parallel
Containers other than Array, like NativeList, can only be in read-only mode under parallel execution. So how to write to them?
In design, NativeList is divided into Add and Set operations. The correct usage pattern is: one Job performs Add operations, and a second Job performs Set operations.
For Add, you can use ParallelWriter and AsParallelWriter. Usage is as follows:
    public struct AddListJob : IJobParallelFor {
        public NativeList<float>.ParallelWriter result;

        public void Execute(int i) {
            result.AddNoResize(i);
        }
    }

    public void RunIJobParallelForList() {
        var results = new NativeList<float>(10, Allocator.TempJob);
        var jobData = new AddListJob() {
            result = results.AsParallelWriter(),
        };
        var handle = jobData.Schedule(10, 1);
        handle.Complete();
        Debug.Log(String.Join(",", results.ToArray(Allocator.TempJob)));
        results.Dispose();
    }
In this state, NativeList has a fixed capacity; memory must be pre-allocated before starting, and you can only operate AddNoResize(). This method is implemented via atomic locking of the Length property, which incurs significant performance overhead.
Then, use the lossless conversion from NativeList to NativeArray: NativeList.AsDeferredJobArray(). The returned NativeArray is lazy; conversion only happens when the Job actually runs, so it can be passed in before both Jobs execute:
var addJob = new AddListJob { result = results.AsParallelWriter() };
var jobHandle = addJob.Schedule(10, 1);

var setJob = new SetListJob { array = results.AsDeferredJobArray() };
setJob.Schedule(10, 1, jobHandle).Complete();
Note that both AsDeferredJobArray and AsArray return Views, i.e., views of the original data. The source data must still be Disposed.
Parallel Pattern for Two-Dimensional Arrays
IJobParallelFor can only parallelize per single element of an Array. However, parallelizing per row of a two-dimensional array is more useful and can enable loop vectorization for higher performance. Use IJobParallelForBatch for this.
First, we create a flattened 2D array of size [10*15]. Then schedule it with IJobParallelForBatch.Schedule(int length, int batchCount). batchCount indicates how many data points each job is responsible for. Execute will be called length/batchCount times.
var results = new NativeArray<float>(10*15, Allocator.TempJob);
var jobData = new MyJob2D {
    result = results
};
var handle = jobData.Schedule(10*15, 15);
handle.Complete();
Debug.Log(String.Join(",", results));
results.Dispose();
Then the implementation of MyJob2D.
[BurstCompile]
public struct MyJob2D : IJobParallelForBatch {
    public NativeArray<float> result;

    public void Execute(int i, int count) {
        for (int j = i; j < i + count; j++) {
            result[j] = i;
        }
    }
}
Execution result:
0,0,0,0,0,0,0,0,0,0,0,0,0,0,0,
1,1,1,1,1,1,1,1,1,1,1,1,1,1,1,
2,2,2,2,2,2,2,2,2,2,2,2,2,2,2,
3,3,3,3,3,3,3,3,3,3,3,3,3,3,3,
4,4,4,4,4,4,4,4,4,4,4,4,4,4,4,
5,5,5,5,5,5,5,5,5,5,5,5,5,5,5,
6,6,6,6,6,6,6,6,6,6,6,6,6,6,6,
7,7,7,7,7,7,7,7,7,7,7,7,7,7,7,
8,8,8,8,8,8,8,8,8,8,8,8,8,8,8,
9,9,9,9,9,9,9,9,9,9,9,9,9,9,9
UnityEngine.Debug:Log (object)
This method can automatically enable loop vectorization via Burst, so in the performance test, calculating 100,000 times took 0.09ms, making it the fastest.
Other Limitations
- You cannot start a Job from within a Job.
Combining with Async
The above examples schedule Jobs in Update and Complete in LateUpdate, aiming to accelerate Update code. For one-time tasks, it’s not that troublesome; you can use Async to wait directly without blocking rendering. Use the extension method CompleteAsync from the package:
async void GenerateMesh() {
    result = new NativeArray<float>(100000, Allocator.Persistent);

    MyJob jobData = new MyJob{
        result = result
    };

    handle = jobData.Schedule();

    await handle.CompleteAsync();
}
Note: This pattern requires using the Persistent allocator because you are not guaranteed to finish within 1 frame.
Burst
Burst, based on LLVM, is a subset of C# called “High-Performance C#”, essentially C code. It is typically 10 to 100 times faster than Mono, which also shows how slow Mono is.
Burst can further enhance Job execution speed. For the examples above, just add this line:
 [BurstCompile]
 public struct MyJob : IJobParallelFor {
     ...
 }
In the IJobParallelFor performance test, just this line reduced execution time from 5.16ms to 0.21ms. At this point, Job execution speed finally surpasses the For loop.
Note: The above performance tests are based on conclusions using 10 Workers. Fine-tuning the number of Workers may yield different performance results.
Vectorization
Vectorization packs multiple calculations into one instruction. For example, float3 calculations are naturally vectorized. For vectorization, it’s best to use types and methods from the Unity.Mathematics library; otherwise, it might fail.
If you are not performing vectorized calculations, you can also vectorize loops. The previous performance test improved further to 0.09ms with this. See the earlier section on two-dimensional arrays. Loop vectorization allows some parallelizable For loop calculations to be completed within one instruction set; Burst automatically determines and optimizes this.
How to Know if a Job is Correctly Vectorized?
Open the Burst Inspector tool (in the Jobs menu).
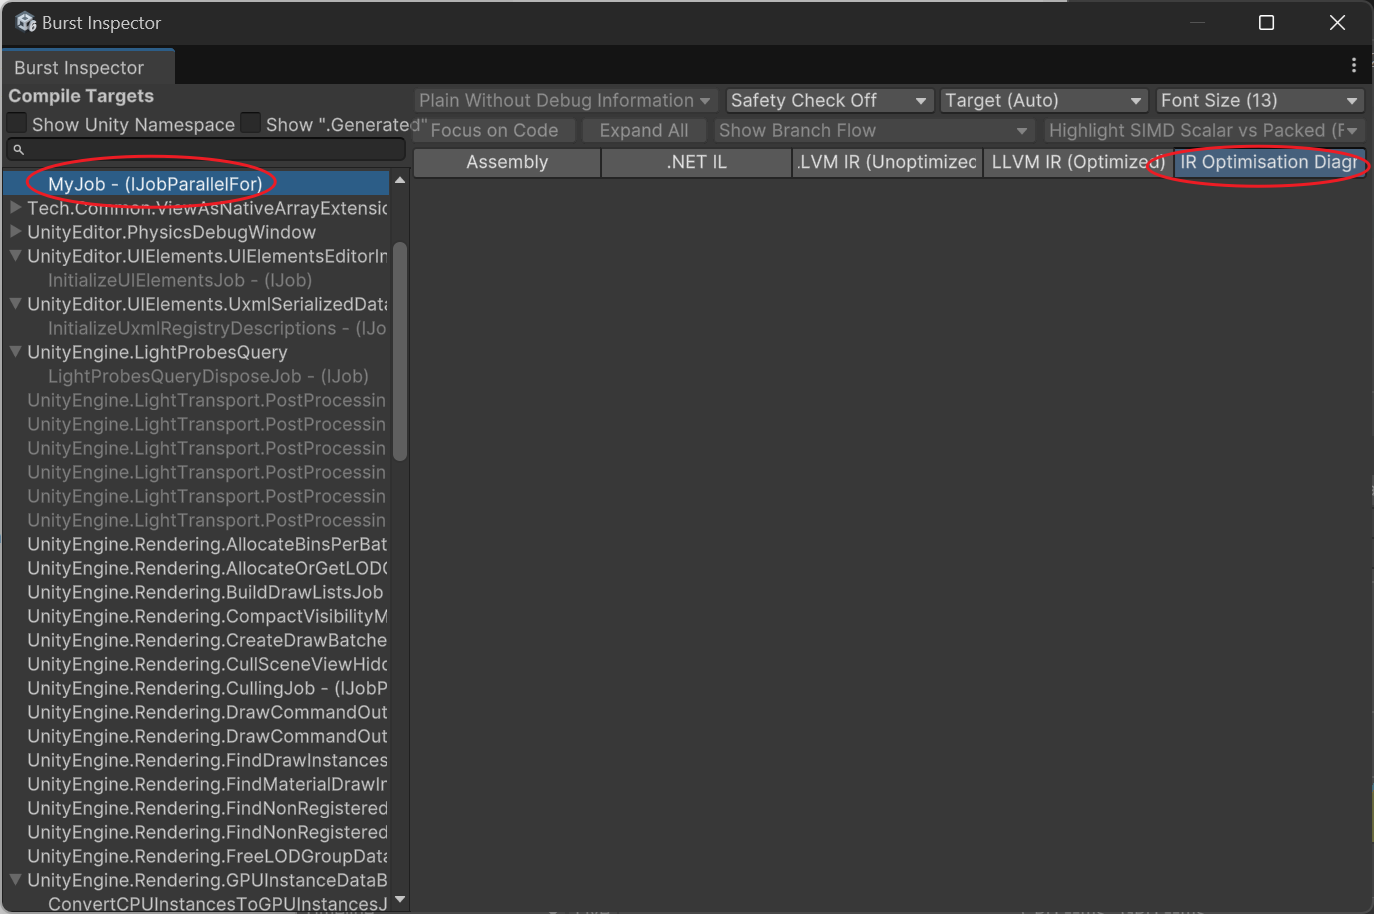
Select your function and check the Assembly for AVX instructions and check the IR Optimisation for warnings. If not properly vectorized, it will show:
---------------------------
Remark Type: Analysis
Message:     test.cs:30:0: loop not vectorized: call instruction cannot be vectorized
Pass:        loop-vectorize
Remark:      CantVectorizeInstructionReturnType
Common ones are:
- loop not vectorized: call instruction cannot be vectorized Refers to calling an external function that cannot be vectorized.
- loop not vectorized: instruction return type cannot be vectorized Usually, this means calling an already optimized function, so it cannot be vectorized a second time, which is normal.
Converting Between Job and Unity Data
One of the most painful aspects of using Jobs and Burst is converting various data to NativeArray.
For example, Vector3 needs to be changed to float3. Since they are the same size, they can be directly cast. Example:
var floats = new NativeArray<float3>(100, Allocator.TempJob);
NativeArray<Vector3> vertices = floats.Reinterpret<Vector3>();
Vector3[] verticesArray = vertices.ToArray();
floats.Dispose();
You can also Reinterpret into a struct, for example, converting 3 float1s into 1 vector3:
var floats = new NativeArray<float>(new float[] {1,2,3}, Allocator.TempJob);
NativeArray<Vector3> aaa = floats.Reinterpret<Vector3>(sizeof(float));
Debug.Log(string.Join("\n", aaa.Select(v => v.ToString())));
floats.Dispose();
(1.00, 2.00, 3.00)For casts like NativeArray<int> to NativeArray<ushort>, you need to create your own Job for conversion.
JobSystem that Automatically Batches Execution on WebGL Platform
JobSystem code on the WebGL platform is executed by the main thread, so IJobParallelFor with many tasks will directly freeze the game.
You can create an AdaptSchedule interface that automatically determines whether it’s a WebGL environment or a multithreading environment. Under WebGL, it executes frame by frame according to the number of workers. Each step will yield return an Awaitable, allowing the main thread to catch its breath.
Conclusion
Burst is actually a compromise to achieve code acceleration, which also brings a mindset of wanting everything to be Burst-compatible. Ultimately, the code becomes ugly, and compilation slows down. The DOTS library is also filled with such traces. Unity, with increasing entropy, is becoming more bloated and slower to compile. For larger-scale application of DOTS, this issue must be resolved.
Unity 7 will support .Net 8+ and CoreCLR, which will increase Editor compilation speed and allow the use of many new .Net features, reducing the cost of communicating with C code. Let’s look forward to it a little; perhaps in the future, we won’t need to use Burst so frequently in many places.
Edited in February: The director responsible for CoreCLR has resigned due to disagreements. Everyone, let’s move on.