Ender 3 V2 High-Speed Modification and Upgrade Experience
As a high-value DIY machine, the Ender 3 V2 is genuinely slow. Initially, I thought upgrades weren’t necessary. Actually, modifying the printhead costs only about 60 RMB. Upgrade early, enjoy early. Doubling the speed is essentially like having two printers. Moreover, aside from adjusting the motherboard voltage, this entire modification doesn’t require touching any other part of the mainboard. It can be done alongside the dual Z-axis upgrade.
The Ender 3 is already the printer with the most online resources, yet I still encountered many undocumented situations during the process. Below is my upgrade path, which you can follow in order.
1. Extrusion
The first issue encountered was extruder slippage, causing filament grinding mid-print and print failure. This is a problem with single-gear extruders. Generally, replacing it with a 23 RMB domestic BMG clone extruder perfectly solves this. This is the easiest and cheapest upgrade. Plus, most direct drive setups use this BMG extruder, so it’s a worthwhile investment either way.
After installation, the E-axis gear ratio needs to be set to 425.5, which can be configured on the screen.
2. Infill Overflow / Elephant’s Foot / Over-Extrusion
Next, when printing solid infill on the bottom or top layers, overflow occurs. Initially, I thought it was over-extrusion. However, when calibrating extrusion using a calibration cube, I found the line width on the right side was always smaller than the others.
This is because the Ender 3 is a single Z-screw machine, with support only on the left side; the right side is cantilevered. Therefore, when raising the Z-axis, the actual lift on the right side is inconsistent. The first few layers are almost certainly under-lifted; a 0.2mm layer height might initially only lift 0.1mm per layer. Loosening the screws on the right-side wheels provides minimal relief.
Inaccurate layer height severely impacts quality and complicates debugging for many issues. To achieve perfect layer lines, an upgrade is essential.
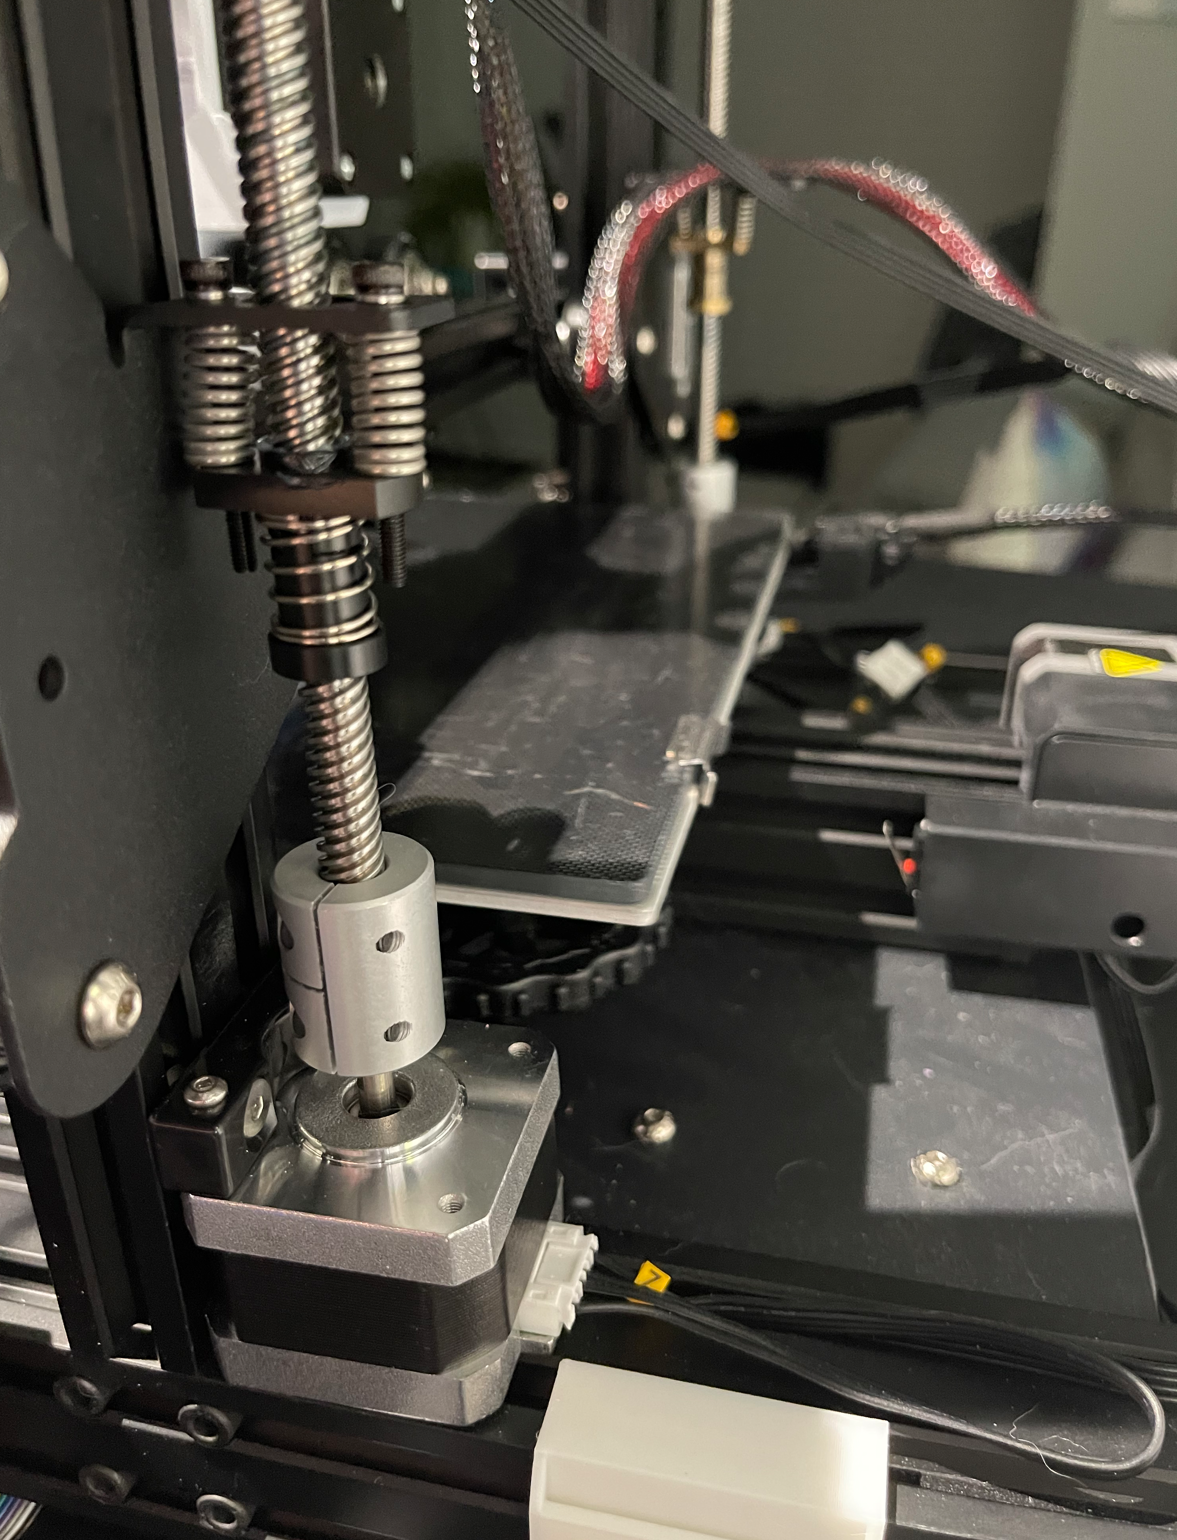
I bought a dual Z-axis kit for 77 RMB on 1688, advertised as not requiring motherboard disassembly and easy to install. After installation, test prints required bed leveling every time, and it was impossible to get it perfectly level. Wavy patterns also appeared during printing.
Dual Z Fix 1: Adjusting Voltage
First, because the two Z-axis stepper motors are wired in parallel, the current supplied to each is insufficient. The originally warm stepper motors felt cool to the touch, indicating insufficient torque causing Z-screw slippage, so layer height remained unstable.
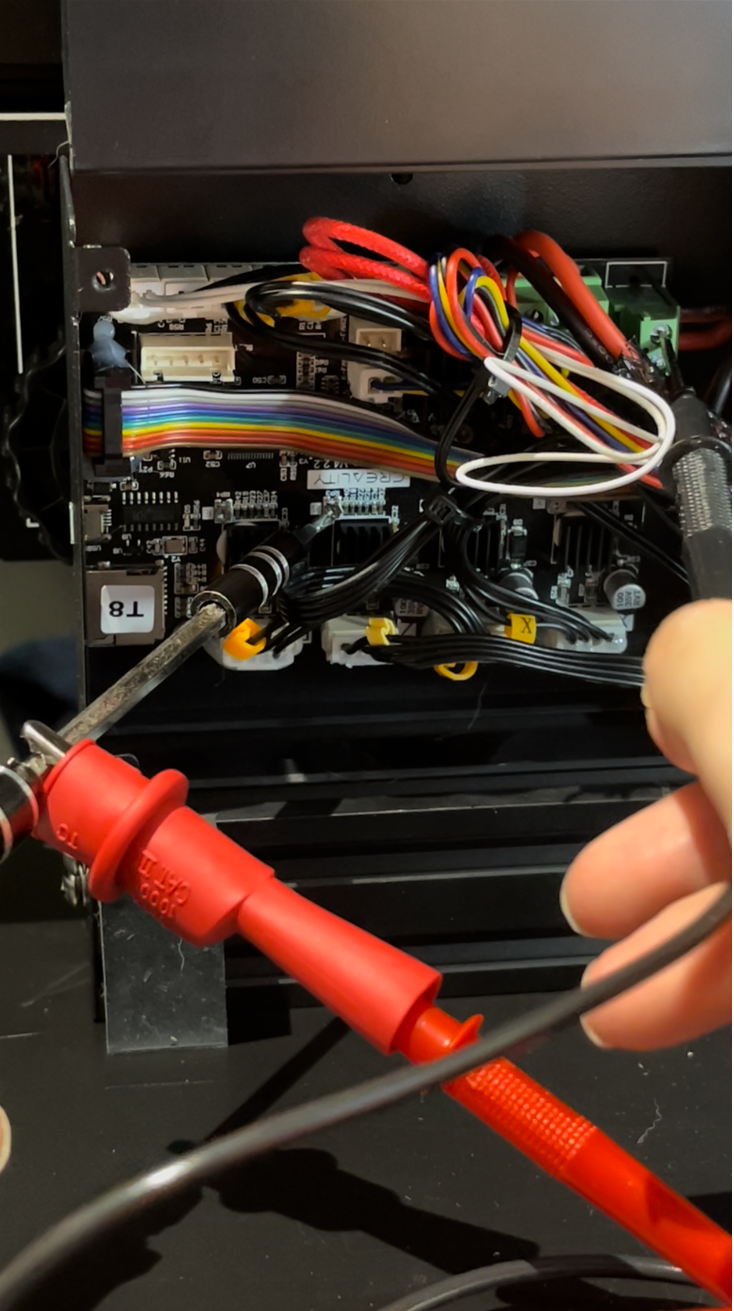
The solution is to increase the stepper motor current. However, I found it couldn’t be changed via software, neither in the firmware nor via the M906 command. The reason will be explained later.
The only way was to disassemble the motherboard and use a multimeter to adjust the $V_{ref}$ voltage for the Z-axis stepper driver on the board. There’s an adjustment potentiometer next to each stepper driver. Adjust while measuring the voltage with a multimeter (be careful not to cause a short circuit).
First, the formula for TMC series drivers is: $\frac {I_{max}} {\sqrt 2}=\frac {325mV} {R_{SENSE}+30m\Omega} * \frac 1 {\sqrt 2} * \frac {V_{ref}} {2.5V}$
My motherboard has surface-mount resistors labeled R150, so basic math: $R_{SENSE}=150m\Omega$ $\frac {I_{max}} {\sqrt 2} = \frac {325mV} {180m\Omega} * \frac 1 {\sqrt 2} * \frac {V_{ref}} {2.5V}$ $\frac {I_{max}} {\sqrt 2} / (\frac {325mV} {180m\Omega} * \frac 1 {\sqrt 2} * \frac 1 {2.5V} ) = V_{ref}$ $I_{max} * \frac {2.5V} {\frac {325mV} {180m\Omega}} = V_{ref}$ $V_{ref} \approx 1.3846153846153846 *I_{max}$
The factory-measured $V_{ref}$ for the Z-axis driver was 1.18V, matching the Ender 3 V2’s XYZ motor specification of $I_{max}=0.84A$. Doubling it seemed excessive and would exceed the TMC2208’s maximum of 1.4A RMS. I opted to double the 0.58A current (from early Ender 3 models) to 1.16A, thus adjusting $V_{ref}$ to approximately 1.6066V.
A range of 1.6V-1.65V safely resolves this issue, but the actual current was still insufficient, and the motors remained cool. I tried adjusting to 1.8V-2.0V, but the motors would randomly shut down, confirming that approaching the maximum is not advisable. Additionally, the right motor ran hotter. Even at 1.7V, printing ABS at higher temperatures caused the right side to skip steps. After all this tinkering, I began to understand the appeal of single-motor belt-driven dual Z-axis solutions—at least you only need to worry about one motor’s precision.
If you plan to adjust voltage, I suggest holding off initially, as high-speed upgrades also require voltage changes.
Dual Z Fix 2: Addressing Bent Rods
Being budget parts, the rods might not be perfectly straight, or installation dimensions might have slight errors, causing excessive resistance on the Z-axis motors. First, I removed the top Z-screw stabilizers, which significantly reduced resistance. Then, I added tolerance for the screws, for example, by using flexible couplers.
3. High-Speed Modifications
When attempting high-speed printing with the Ender 3 V2, uneven extrusion occurred at higher speeds, with all extrusion piling up at corners, making the model a mess. It felt like pressure buildup in the Bowden tube/hotend cavity. Upgrading the hotend and switching to direct drive resolved this. The existing hotend’s flow rate is $12mm^3/s$, limiting maximum speed to about 133mm/s with a 0.4mm nozzle and 0.2mm layer height.
Ranking modification importance by contribution: $Firmware Upgrade/Tuning > E-axis TMC Jumper Wire > E3D V6 Volcano > Direct Drive$
The E-axis TMC jumper wire can significantly increase perimeter speeds but is not covered in this article.
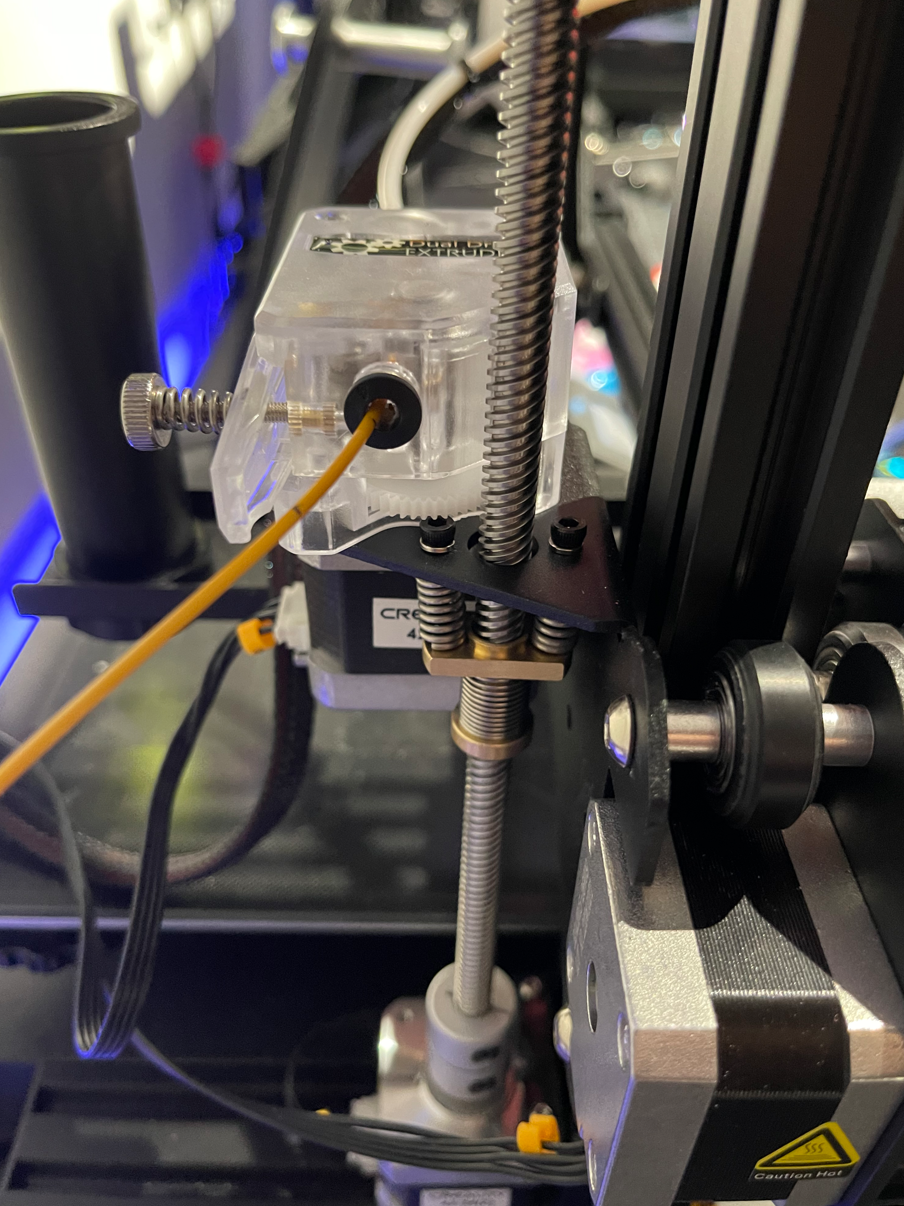
Direct Drive Conversion
I didn’t test the direct drive’s impact on quality separately as I did it alongside other upgrades. Even if the improvement is minor, it’s necessary as it definitely reduces retraction, significantly speeding up prints with lots of retractions (e.g., Moon Lamp improved by 22%).
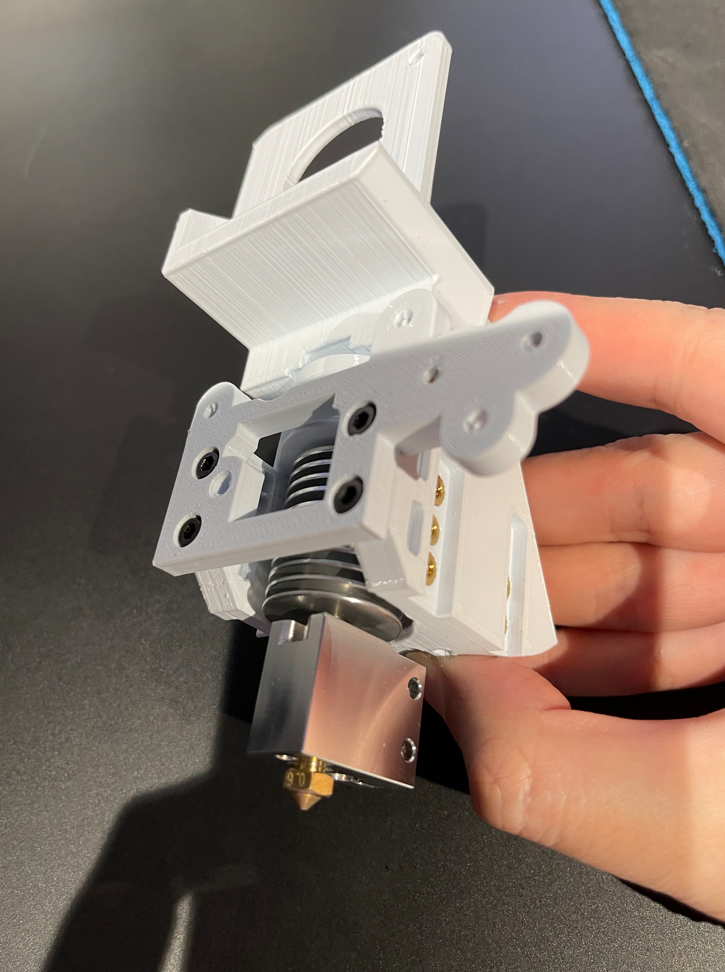
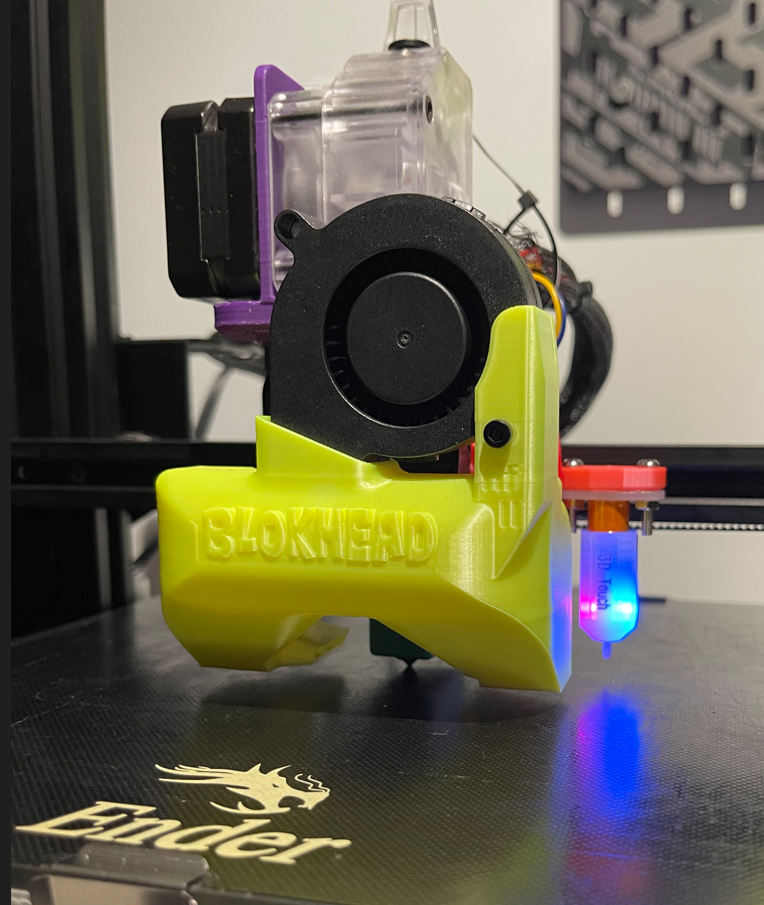
This simply involves mounting the previously purchased BMG extruder and its motor directly above the hotend, requiring a self-printed ABS+ bracket.
I first chose the HeroMe V6 bracket: HMG6 DD Base E3DV6-Revo Six-BMO - Bondtech BMG Reverse, because it’s one of the few designs with a rear-mounted extruder motor, keeping the center of gravity closer to the center. Additional parts to print include: Ender 3 Series Gantry Clip, Ender 3V2 E3DV6-Revo Six-BMO Gantry Adapter, HMG6 E3D V6 collar, and HMG6-tall-lightweight-5015.
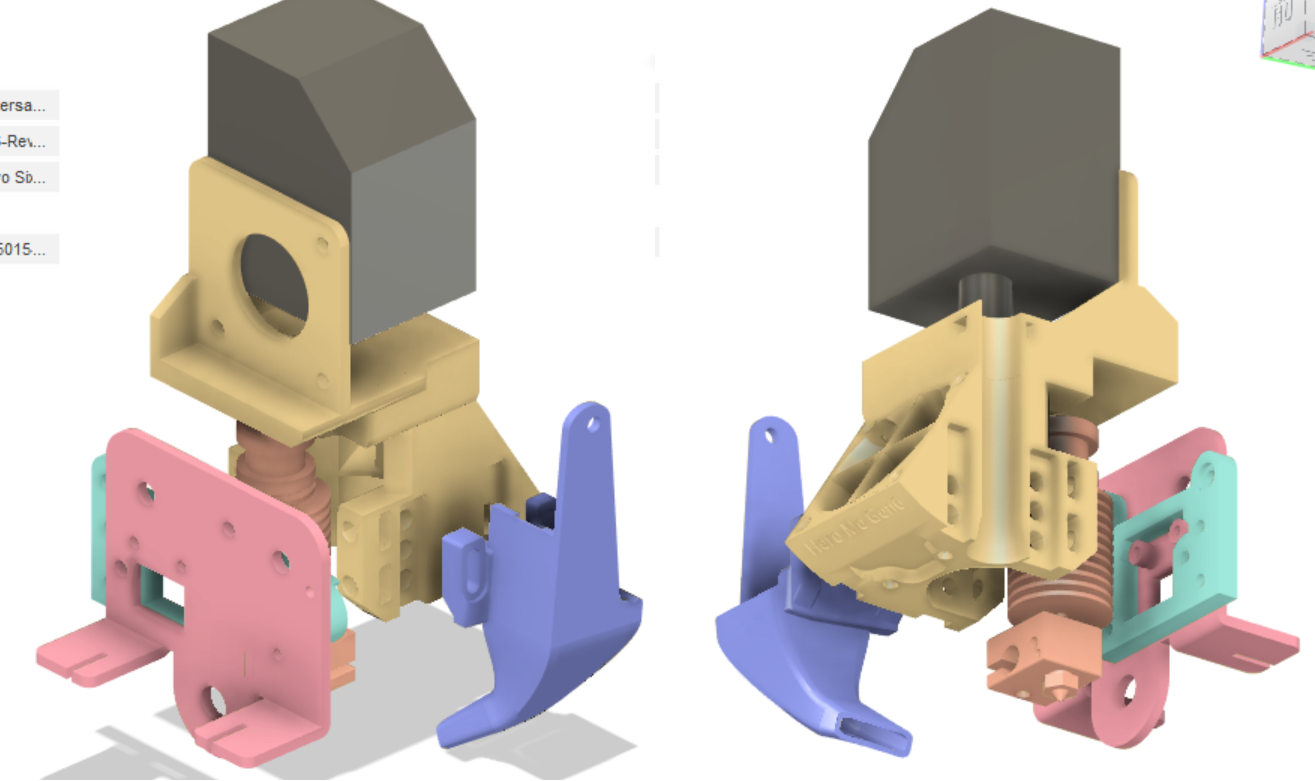
This bracket has the following drawbacks:
- The entire printhead is fixed to an adapter, which is then fixed to the carriage, making it prone to wobbling, especially with PETG prints.
- Maintaining the hotend is very inconvenient, requiring complete disassembly.
- Due to point 1, fan vibrations also cause the entire printhead to shake.
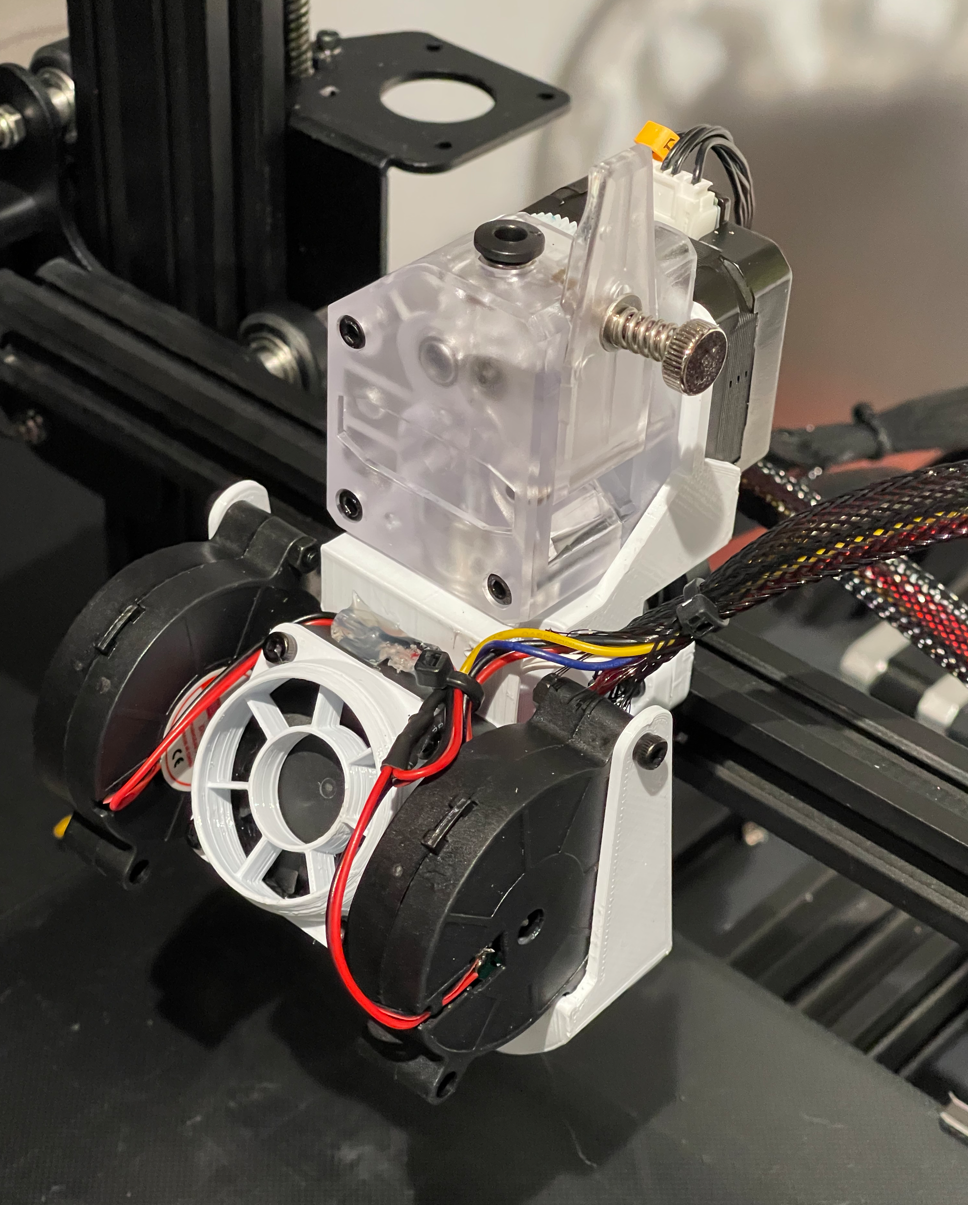
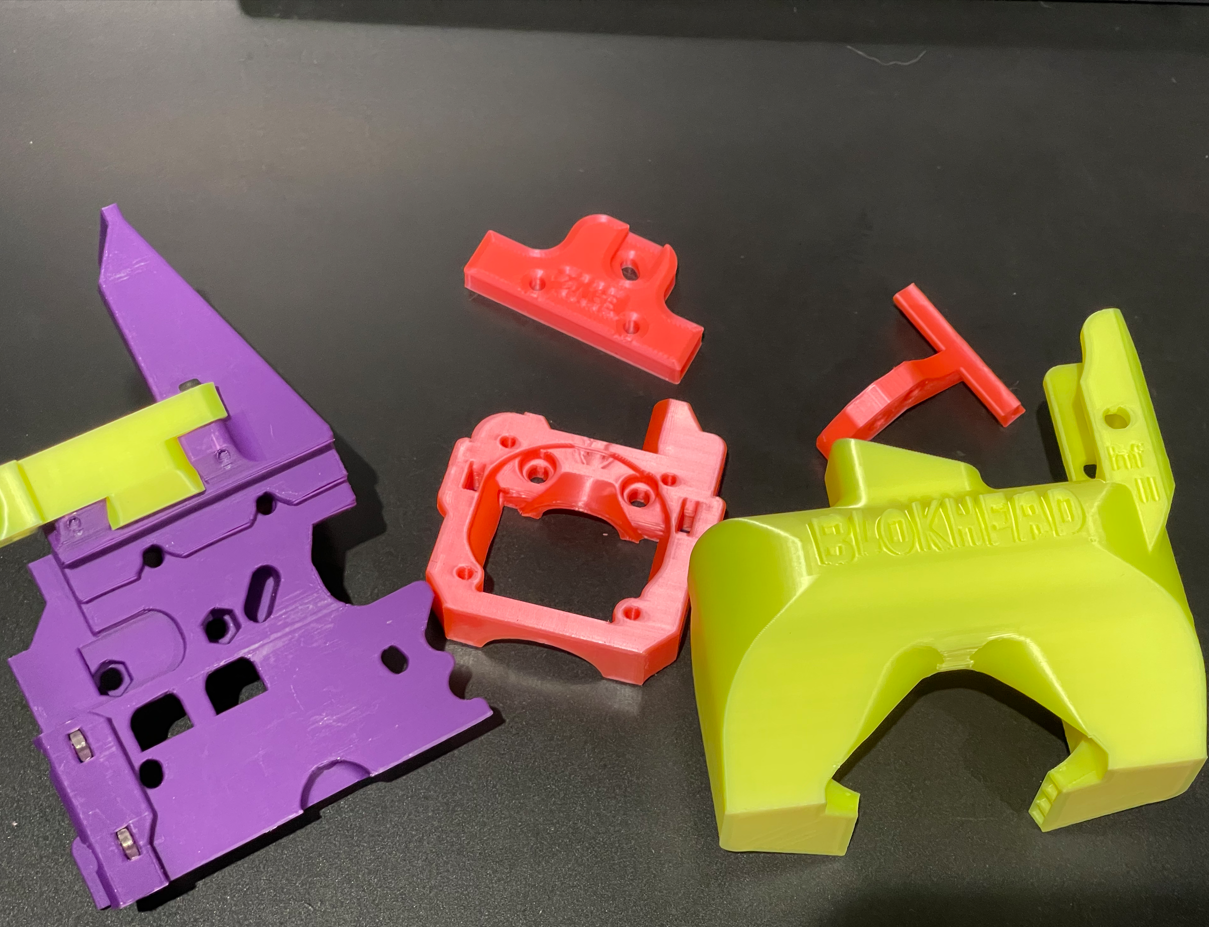
Therefore, I tried printing the Petsfang bracket with ABS+: BMG.E3d.Volc.AIOBase.3.16.21, E3D.30mmCap.3.16.21, and with PLA: Blokhead_HI.Flow.II.5.26.21, End3v2.Backbrace.3.16.21, VOLC.BLT.X48_Y-2_Rt.3.16.21. After installation, it was indeed stable.
Printing brackets requires a bunch of screws; HeroMe also requires heat-set inserts. I mindlessly bought all the fasteners listed in the Voron2.4 sourcing guide’s fastener section, eliminating the need for selection. Basically, all the fasteners needed for printer mods are there. It cost over 200 RMB, which is expensive, so I’m ignoring that cost here.
Hotend Upgrade
Domestic E3D V6 clone: 2.6 RMB (choose the Bowden version), E3D Volcano heater block: 7.5 RMB, Volcano nozzle: 1 RMB (or use a standard heater block + CHT nozzle for 10 RMB). Total cost under 12 RMB—the king of cost-performance.
The Volcano’s $25mm^3/s$ flow rate is more than double, provides more even heating, increases layer adhesion, and allows switching to a 0.6mm nozzle (my 0.4mm nozzle collects dust now). However, the Volcano cavity holds more molten filament, making retraction less effective and prone to oozing/stringing, requiring maintaining high speeds. A CHT nozzle can increase flow by 30% without changing the heater block.
Use an all-metal heatbreak only for ABS, as the higher temperature can melt PLA in the throat, causing clogs if retraction is too high or feed is too slow.
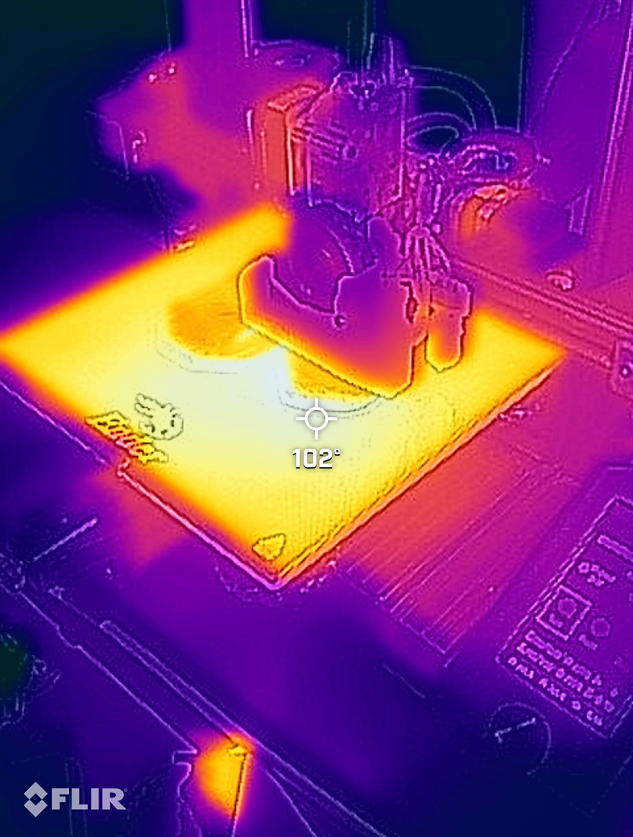
I also upgraded to a 350°C NTC100k thermistor (4 RMB) for printing ABS at higher temperatures, and a 24V 50W heater cartridge (10 RMB), mainly because I found the 40W cartridge couldn’t keep up with temperature when the fan was at 100% and flow was 25. However, the goal of this article is 2x speed, so the heater cartridge upgrade might not be necessary for that.
For hotend cooling, you can use the original hotend’s 4010 fan. For the part cooling duct, use a 5015 blower fan (10 RMB). For installation, I lazily cut the wires of the original blower fan and soldered the new fan on.
I wanted to find a compact hotend bracket that integrates the BMG and direct-drive E3DV6, but the Ender 3 X-carriage is too limiting. Switching to linear rails would offer more options. You can buy domestic linear rails for about 40 RMB, but at that point, you might as well build a Voron.
When assembling the hotend, you can apply some industrial thermal paste rated for 400°C on the sensor, heater cartridge, and the threaded part of the heatbreak (only on the side facing the heatsink). Industrial paste costs about 60 RMB for 100g, which is expensive, so I’m ignoring that cost.
Heated Bed Temperature Increase
The official heated bed only supports 90°C. In practice, it shuts down at 80°C when printing ABS. This is because the motherboard fan is tied to the part cooling fan. When printing ABS, the part cooling fan is usually off, and with the bed at 90°C, your motherboard might overheat. You need to rewire the motherboard fan to run continuously.
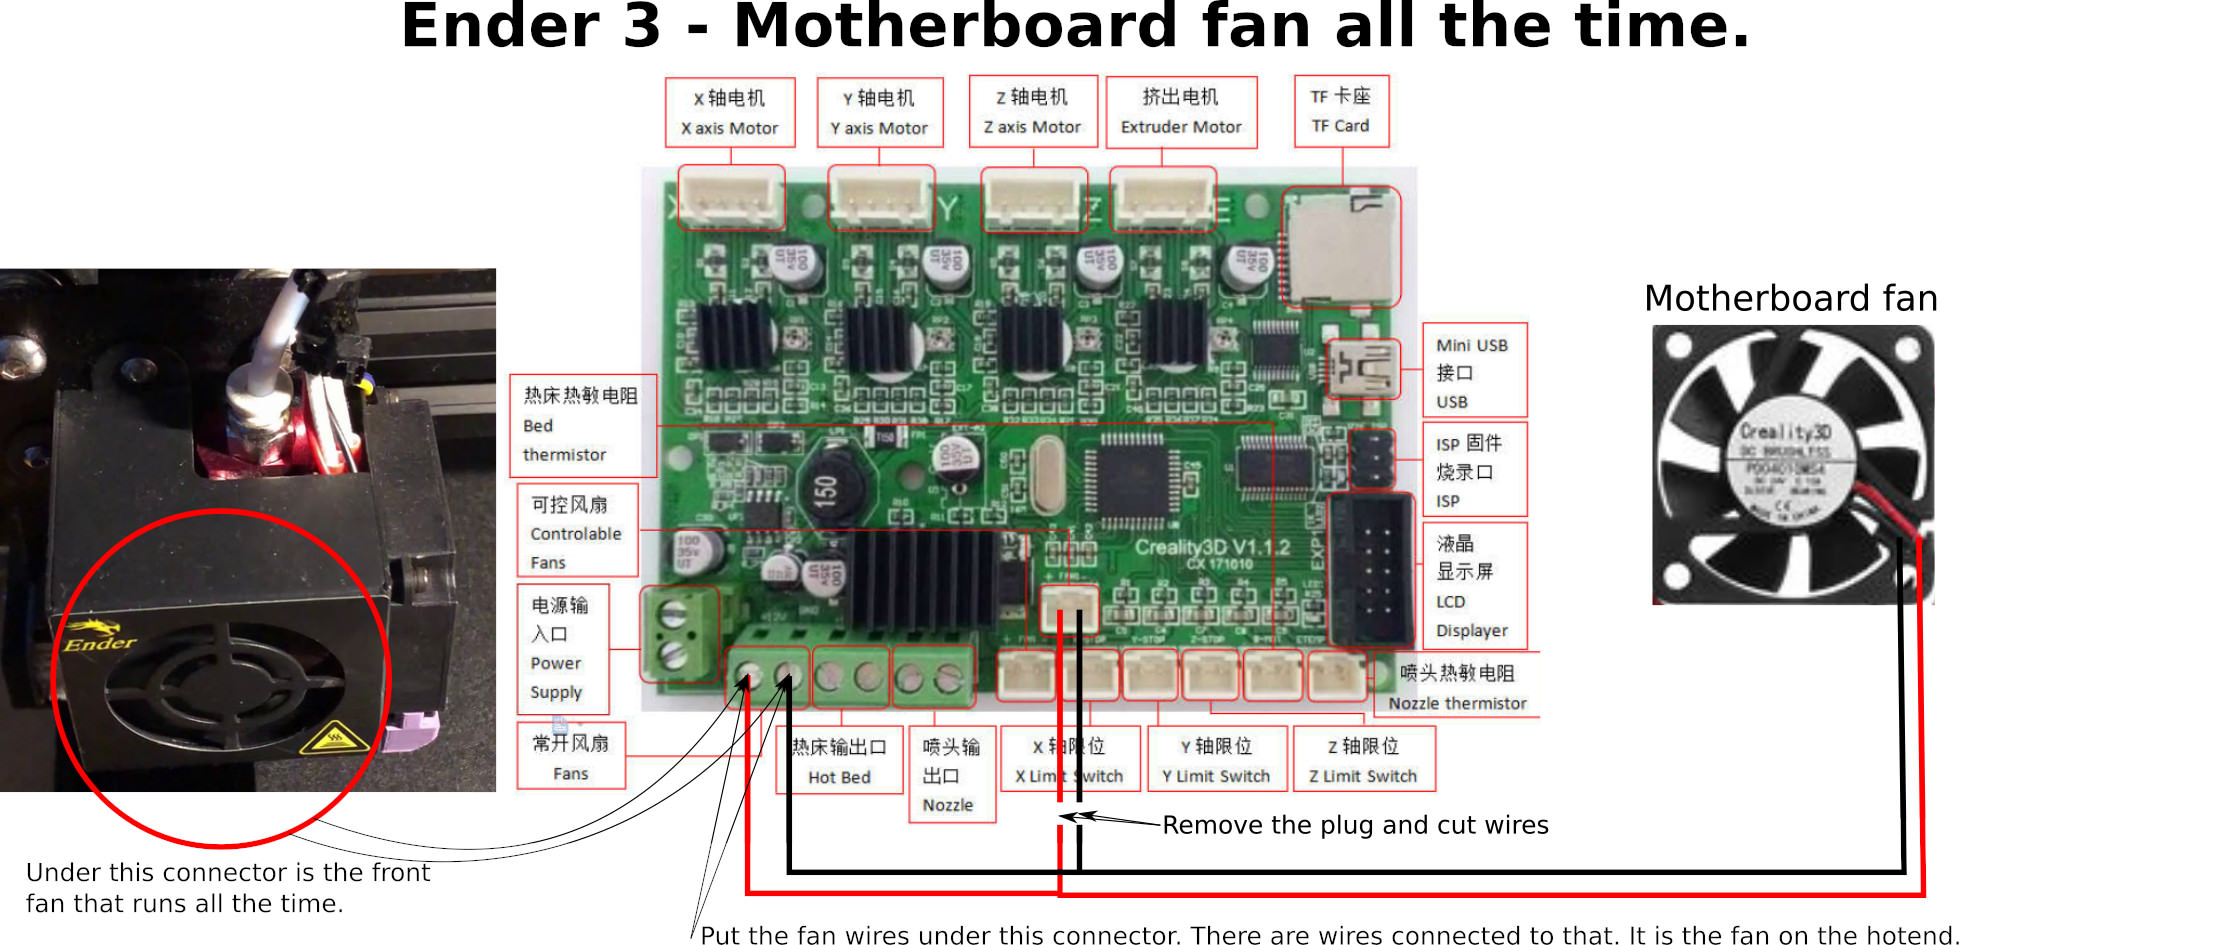
After this modification, you can reach 110°C. There are two more motherboard modifications later that can be done together.
Extruder Stepper Motor Replacement
You need to replace it with a 42 “pancake” stepper motor under 23mm thick (13 RMB), otherwise it’s too heavy. With a rear-mounted bracket, it might also hit the frame. This again requires adjusting the motor voltage because the thinner motor obviously can’t handle the original voltage and becomes excessively hot. The factory-measured $V_{ref}$ for the E-driver was 1.38V. My purchased 42-23 motor has a rated current of 1A, which converts to an RMS $I_{max}$ of 0.707A. So I adjusted $V_{ref}$ to 0.98V, and the temperature feels normal now.
During testing, I also found the extruder motor would jitter once and stop. I thought the motherboard was dead. After extensive testing, I found the terminal on the E-axis wire connector wasn’t crimped properly at the factory. Who knew motor wires could be faulty.
Firmware Parameter Modification
After all the soldering and assembly, it’s time to modify Marlin firmware parameters. I chose to directly modify JyersUI parameters for convenience. Open it in VSCode, install the PlatformIO extension, and you can compile directly without adjusting compilation options. After compiling, copy the .bin file to the SD card, insert it, power on, and you’re done. (Sometimes the motherboard doesn’t update for unknown reasons; you need to change the filename’s “firmware” part.)
I used the UBL-BLTouch-10x10 configuration file because I installed a 3DTouch. After copying the configuration file to the Marlin directory, modify Configuration.h:
#define HEATER_0_MAXTEMP 300 // The hotend can now reach 300°C, and the temperature sensor is rated for 350°C.
#define EXTRUDE_MINTEMP 160  // Adding this allows printing with expired filament, rapidly reducing cost from 90 RMB/kg to 25 😂
#define DEFAULT_MAX_FEEDRATE          { 500, 500, 10, 120 }  // Increase speeds
#define DEFAULT_MAX_ACCELERATION      { 1500, 1500, 200, 2000 }  // Conservative acceleration settings; after changing the heater cartridge, 3000 is fine.
#define NOZZLE_TO_PROBE_OFFSET {  44.5, 6.5, 0 }  // Auto-bed leveling coordinates for the Petsfang bracket
#define Y_BED_SIZE 228  // My machine's Y-axis only reaches 228
#define Y_MIN_POS -13  // The hotend is about 13mm thicker
#define Y_MAX_POS (Y_BED_SIZE + Y_MIN_POS)
#define Z_MAX_POS 230  // For the HeroMe bracket, fill in 200
Modify Configuration_adv.h:
  #define BLTOUCH_HS_MODE  // Increase auto-bed leveling speed
  //#define STEALTHCHOP_XY  // Disable these three, especially for the Z-axis, to increase torque
  //#define STEALTHCHOP_Z
  //#define STEALTHCHOP_E
Note: Enabling Linear Advance (pressure advance) significantly increases perimeter speed and solves issues with corners not being sharp. However, the TMC drivers on the Ender 3 V2 motherboard are in StandAlone mode, meaning the firmware cannot control them (this is also why we had to manually adjust $I_{max}$). To enable Linear Advance, you need to manually solder a jumper wire on the motherboard, connecting the E-axis TMC to the PA13 pin. Since one end is on a tiny surface-mount resistor, I lacked the skill and gave up. If you have the skill, you can try.

PID
The new firmware has an Autotune PID function. Remember to run it after flashing. Set target temperature to hotend 250, Bed 90, and iteration count to 20. If you install a new hotend without adjusting PID, you might encounter heating failure errors.
PrusaSlicer Software Parameter Modification
Essentially, just change it to the Voron 2.4 default speeds 😙.
Print Speeds
Perimeters: 100 Small perimeters: 40 External perimeters: 40 (Since I didn’t enable pressure advance, perimeter speed can’t go higher) Infill: 125 Solid infill: 120 Top solid infill: 40 Support material: 90 Bridges: 40 Gap fill: 40 Travel: 300 Maximum print speed: 300 Maximum volumetric speed: 25
The above settings are conservative, meaning they guarantee quality at these speeds and comply with the original hotend’s flow rate. In practice, I often print at 2x speed. For silk filament, you must use the original slow speeds because ghosting issues become more pronounced at high speeds with silk.
Filament Cooling
Fan speed: Dual fans maximum 50%, single fan depends on its speed. Cooling thresholds: Set to 7 if layer print time is below.
Printer Settings
Print bed shape: Size X:225, Y: Set to 215 because of Y_MIN_POS -13 Maximum print height: 230 G-code flavor: Marlin2
Extruder section Retraction length: For direct drive, set to 0.75. For Volcano hotend, may need to increase to 2. Test yourself. Lift Z: 0, otherwise, with a full Volcano heater, oozing material can cause stringing. Retraction speed: 50 Deretraction speed: 30 Minimum travel after retraction: 3 Wipe while retracting: Yes, 70%, to reduce blobs.
The new hotend heats more evenly, so print temperature might need to be lowered by 5-10°C. Re-run temperature tower tests for various materials.
Other Upgrades
During high-speed printing, I encountered ghosting issues. Considering factors: 1) the printhead became heavier, 2) the heated bed is already heavy. Acceleration/deceleration-induced shaking of the printhead/bed causes ghosting. The mitigation method is to prevent the frame from vibrating as much as possible. Install softer damping feet to let the entire machine vibrate, dispersing inertial forces. Overall machine wobble